Showing posts with label renaissance. Show all posts

Thursday, March 12, 2020

Sberna Diary

I'll be recreating the Sbernia (an Italian mantle with arm slits) from, "Portrait of a Lady," by Giovanni Ambrogio de Predis (1485).

Portrait of a lady, Giovanni Ambrogio de Predis
1/27/2019
I was researching mantles in my Facebook sca groups. A few years ago, some one posted the details to a blog, Here

After reading this article, looking at more art and seeing half circle cloaks in person, it seems that a Sbernia is a half circle as well. Alcega's tailoring book (which you can down load here) has quite a few mantle patterns and lay outside in it. I'm having a small problem with choosing which pattern to use.
St. Catherine, Botticelli, 1475

Lady with an ermine, da Vinci, 1490
4/27/2019

After some serious thought, Mr. Badger and I made the pilgrimage up to the Washougal to hunt for some wool. 

Glorious, glorious wool. We bought two varieties for this sbernia project. The first  was one I wasn’t entirely happy with, and the second only had 3 yards. After washing the yardages in the washer.. the first piece came out beautifully. Lightly fulled and soft, with a beautiful drape. 

The second? Fulled to a big fluff. 

I’m going to end up using the first fabric. 

I’ve made a mock up, which I am relatively happy with... my couching work, however, is a different story. 


1/13/2020

this project has been in the works for so long that it has completely morphed! I'm using a historical Alcega pattern. I traced it onto my fabric with tallow soap, since Alcega mentioned using it in his book. 

I fold my fabric in half (long was)  and traced an egg shape. 


I cut each section along the line, and along the top fold. I machine sewed each seam with a straight stitch and hand finishing the edges with a whip stitch.

I have a nice gold silk that I will be using for the lining.  I will cut it the same way as above, but without the center back seam. I'll be felling the silk seams.

As in the Elenora di Toledo burial dress, I will be adding the lining in by folding in the outside edges, and whip stitching the two together.


3/30
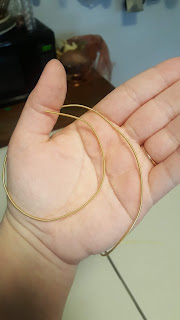
Amid the pandemic quarantine, I have received my gold purl! I ordered 6 quantities from Here, which sells glut purl by the 50cm section. While the product is lovely, I think I will have to order more.


Wednesday, April 26, 2017

Sailor jupiter in 1490! (Updated)

I love sailor moon. It has been one of my most cherished childhood memories. So, Sailor Jupiter is one of my role models. She is an even mix of masculine and feminine  (she gets into fights all the time, but also bakes). There is very little about her that I don't identify with.

After seeing a viking Sailor Scouts! And Morgan Donner's take an a mid 16th century Sailor Moon, I have decided to make an Venetian style gamurra, a la Sailor Jupiter.

I have purchased a green linen for the body of my gamurra, and I am repurposing raspberry silk pj's for the neck trim. I also found some rhaspberry linen for the sleeves.  .....update: I found some pink wool at st. Vinnies that I plan to use instead for trim and sleeves.

My pattern is based on Period pattern 41, and an old Tshirt. I made the bodice much shorter, and created a low scoop neck. I will be cartridge pleating rectangular panels for the skirt.

Here is my lining being cut. It's a green duck cloth that I bought from St. Vinnies. I was going to do three layers of duck cloth and pad stitch them together... but after reading about corded bodices from Jenny la Fleur, and Jen Thompson, I've decided to go in that direction.


Jenny La Fleur didn't cord her shoulder straps, so I figured I wouldn't either :P

After I cord the lining, I'll flat line the bodice with my green linen.


So there's my bodice after I added the cords. I used floral wire to pull the hemp through the channels. I stitched the seam allowance down to keep the cords in place, and then cut off the extra seam allowance.


I folded over the seam allowance of my linen over the corded interlining.. I whipped stitched this down (after using fray stop on my linen. I should've used pinking shears).


Here's a view of the front. Looks super clean. I have the entire front tacked down,
now just to do the same to the back lining.


Here's the lining being whipstitched into place.

I ended up having a small hiccup I didnt notice in my mock up. The armscyth in front wasnt deep enough, and ended up digging into my armpit. I had to take the lining off, cut into the bodice, and reattach the lining.

For my skirt, I cut 4 squares of fabric and sewed them together, to make one large width of fabric. I hemmed this, and sewd a 4 inch strip of pink wool about a foot from the bottom edge as a skirt gaurd. I then cartridge pleated the skirt with 1 inch gathers (total mistake. I took the skirt off and am repleating it with 1/2" pleats, finished by midwinters 2019).

I modified the sleeves from period pattern 41 so that the lower arm slides on, and the upper totally closed instead of lacing.


The front of the dress is finally attached to the skirt again. Completed 1/2019

Saturday, April 22, 2017

Orange Gamurra

Have you ever seen the movie, "Ever After,"? The one with Drew Berrymore as Danielle? It's one of my favorite movies.. and I gotta say, I lurve me some of the costuming. The main dresses worn in this movie are (even though it's set in france), are Italian Gamura. Sure, they took a little creative license with them (Danielle's sleeves are circa 1490, while her bodice is roughly 1520). Marguerite's gowns are pretty decent though, and stay within one time period (later 1400's, early 1500).


I decided to make a gamurra, and purchased Period Pattern 41. I made it pretty true to the directions the first time, with the slight modification of changing the lacing from the back to the side (front and side lacing are documentable in paintings, but I have yet to see back lacing). My gamurra is a florentine style with a squared neck.

I bag lined the bodice with an old pillow case - there is no real support in the bodice. I whipped stitched the front to the back at the shoulder straps. The bodice laces closed with solid cast jewelry spacers I purchased at Joannes.

You can see a small gap in my neckline, and that's because my dress isn't laced tight enough. I also made a pair of orange sleeves that I am in the middle of finishing.

Over all, it's not a bad pattern. It's very easy to work with, and modify :D When I make my next gamurra, I'll be raising the waist line and adjusting the neckline to be a more venetian fashion.


Cioppa/ Pellanda dress diary


This image has been taunting me for months! I love the split sleeves and fur trim. I was recently gifted several yards of a red cotton velveteen to use for this project, and so I figured it's about time to start gathering resources and images in a cohesive manner. (Totally didn't end up using the velveteen lol).

While this garment would be considered old fashioned by 1490, it is still plausable that women would wear something similar. You see this style of dress with smaller, fitted sleeves still in paintings, and I believe it would still be worn at home.

I was not originally sure what shape the sleeves were, but after looking at more images (mostly earlier then I suspected) I have come to think that they are tubular with a set in shoulder.


(Carlo Crivelli, The Annunciation, with Saint Emidius 1486, detail)


(1430?)


(Updated) Materials:
Brown hopsack  linen for the body of the gown, and grey rabbit fur to trim sleeves.

I'm torn about what to line the sleeves with. I have some pale blue silk, or some brocade type fabric. :/ I picked a bright green linen for the sleeves lining and possibly trim.


So, after looking at multiple paintings, trying to figure out construction.. I think I'll be merging the original photo (of the goat girl in red) with the one of the lady in blue. I'll be doing the V neck in the second picture, with the sleeves from the red dress. I'll be copying the fur trim from the red dress as well, but with the additional trim from the blue dress. It'll also be full length.

 I've seen some ciopa's that are a single bodice/skirt, and are more like a loose gown, and I believe that might be a more popular style. However, there is plenty of evidence for a separate bodice and skirt. Originally I was planning on a separate bodice/skirt construction, but I have decided to go against this route - only because I want an easy to wear/lazy over dress.


8/22
I found This pattern which I think would work really well. I'll have to change the sleeve, but I think this might be a good option.

I bought the pattern, above. It's out of print, so it was a little hard to hunt down. I found it on etsy, for about $6. I'll be deepening the V neck, and leaving the front sleeve seems open.

So here's where I am so far, comparing my dress to my inspiration photos. I took my neckline down maybe 1.5" lower to better match the blue dress.


So, I've machine sewn the center back and front seams. I folded over my seam allowance on both sides, and used a running stitch to tack that down.


A big difference between the pattern and my dress is that I drafted a facing to include the armscye. I did that because I only plan on attaching the sleeve to the top of the shoulder. 

To help encase the sewn edges, I'm doing a running stitch just past my internal seam allowance.


4/2018

I finally finished this up in time for my Sargentry trials. I did manage to document more of this on my Facebook page, I just didn't remember to do so here. In the future, I need to remake the sleeves so that they're longer, and more voluminous.